Abstract
Hydrogen is a software synthesizer which can be used alone, emulating a drum machine based on patterns, or via an external MIDI keyboard/sequencer software. Hydrogen compiles on Linux/x86 and Mac OS X, although the latter is still experimental, so ask in the developers mailing list for further details.
Table of Contents
List of Figures
- 1.1. The Audio System Tab
- 1.2. The MIDI System Tab
- 1.3. The Appearance Tab
- 1.4. The Audio Engine Info Window
- 2.1. The Main Toolbar
- 2.2. The Song Editor
- 2.3. The Pattern Editor
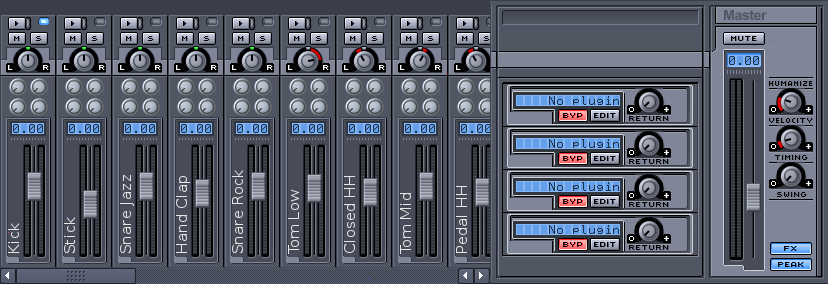
- 2.4. The Mixer
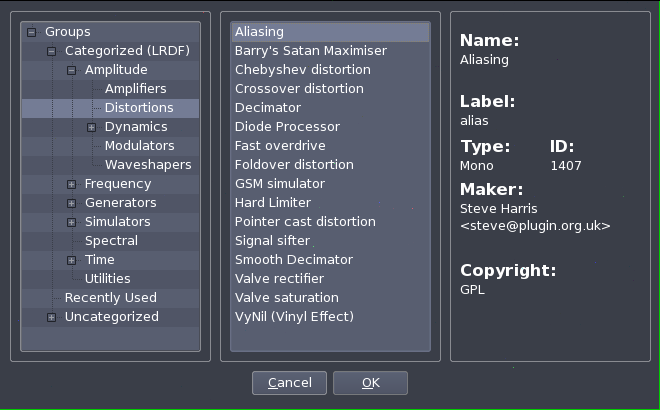
- 2.5. Select an Effect
- 3.1. The Pattern Editor
- 3.2. Inserting Notes in a Pattern
- 3.3. The Mixer
Table of Contents
The latest stable version of hydrogen is available as a tarball at http://www.hydrogen-music.org.
It is possible to download the latest source files directly from our subversion server with:
$ svn co http://svn.assembla.com/svn/hydrogen/trunkA certain release can be fetched with:
$ svn co http://svn.assembla.com/svn/hydrogen/tags/0.9.3
Compiling Hydrogen depends on the following libraries:
qt ( >= 4.0) at http://www.trolltech.com
libsndfile at http://www.mega-nerd.com/libsndfile/
ALSA ( >= 1.x) at http://www.alsa-project.com (only if you wish to use ALSA as audio driver)
Jack Audio Connection Kit ( >= 0.80) at http://jackaudio.org/ (only if you wish to use Jack as audio driver)
PortAudio at http://www.portaudio.com (only if you wish to use PortAudio as audio driver)
Flac at http://flac.sf.net (only if you wish to use flac samples)
ladspa at http://ladspa.org (only if you wish to use ladspa effects)
liblrdf at http://liblrdf.sf.net (only if you wish to use lrdf to categorise effects)
lash at http://lash.nongnu.org (only if you wish to use lash)
Please install them with your distribution's package manager. If you're running a debian-based system, you can install the libraries with:
$ apt-get install libqt4-dev g++ libasound2-dev \
        libjack-dev liblrdf0-dev libflac++-dev libtar-dev libsndfile1-dev \
        liblash-dev libportaudio-dev libportmidi-dev
Decompress the tarball or go to the directory where the subversion copy was checked out:
$cd hydrogen-*$scons$su -c "scons install"
Before compiling, check for additional options with:
$ scons --help
If you want to use features which are not enabled by default (for instance PortAudio), you can enable them with:
$ scons portaudio=1
Namely, if you get some error while running Hydrogen and you want to report it remember to configure hydrogen with:
$ scons debug=1
To clean up compiled code:
$ scons -c
First of all you should make shure that the audio engine is configured properly. The preferences dialog can be accessed via the tools menu (tools -> preferences).
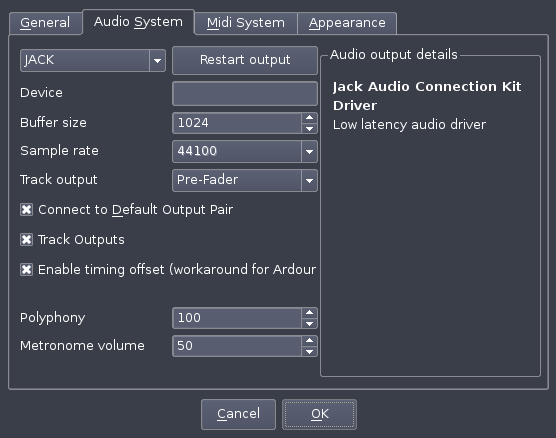
From the "Audio System" tab (Figure 1.1) it is possible to modify the audio driver being used (OSS, Jack, ALSA, PortAudio) with its buffer and sampling rate (unless using JACK, in this case the audio driver configuration should happen before starting the JACK server).
We can set some features of Hydrogen like "Enable track outputs" useful if you want to add effects to a single instrument with jack-rack. "Connect to Default Output Pair" connects the output to the default ports: uncheck this if you want to connect JACK output to other ports without disconnecting them first
Keep also an eye on the value of "Polyphony": depending on your CPU you may want to change the max simultaneous notes in order to prevent hydrogen from overunning the audio driver.
The following drivers are available:
jackd: The Jack driver is a professional audio server which permits very low lag and exchanges with other audio software. We strongly recommend using this driver to have the best out of Hydrogen. JACK server will start automatically if not already running.
ALSA: the widely adopted Linux standard audio drivers
OSS: The Oss audio driver uses /dev/dsp and it's based on the OSS interface which is supported by the vast majority of sound cards available for linux; this said, the use of this audio driver blocks /dev/dsp until Hydrogen is closed i.e. unusable by any other software. Use it as last resort.
PortAudio: an open-source multiplatform audio driver
CoreAudio: a driver for Mac OS X (experimental)
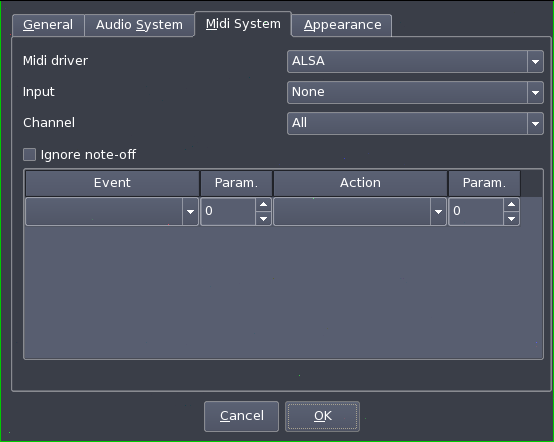
The "Midi System" tab (Figure 1.2) concerns the MIDI input. You can choose the MIDI driver and input, setup channels, binding actions to MIDI events.
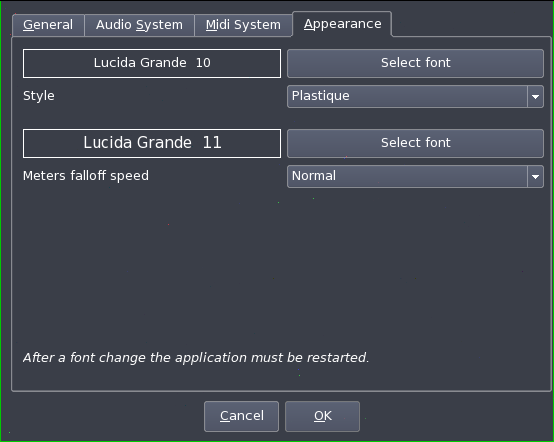
The "Appearance" tab (Figure 1.3) let's you to modify Hydrogen and QT graphical properties.
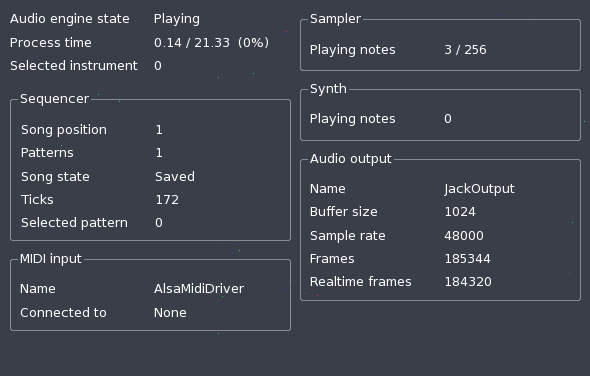
The audio engine info is a window with various stats about Hydrogen and the audio driver. In case JACK is used, buffer and sampling rate should be set before starting Hydrogen (JACK automatically starts when an application tries to connect).
Table of Contents
Before working with Hydrogen, please familiarize with these filetypes:
*.h2pattern: XML file describing a single pattern. Patterns are group of beats and are managed in the pattern editor.
*.h2song: XML file describing the whole song (or sequence). Songs are group of patterns with their properties and are manager using the song editor
*.h2playlist: XML file describing a playlist.A Playlist is a (ordered) group of songs.
*.h2drumkit: a compressed and archived folder containing all sound samples composing a drumkit and a description XML file. Drumkits are basically group of sound samples.
Projects: this menu offers file related functions.
New - Create a new song
Show Info - Set general properties of the song such as name, author, license and generic notes
Open - Open a song
Open Demo - Open a demo song (demo songs are stored in $INSTALLPATH/share/hydrogen/data/demo_songs)
Open recent - Open a menu showing last used songs
Save - Save changes to current song
Save as - Save current song specifying a name (default path: $HOME/.hydrogen/data/songs)
Open pattern - Open a saved pattern belonging to the current drumkit
Export pattern as - Saves a pattern. It will be stored in $HOME/.hydrogen/data/patterns/drumkit_name
Export MIDI file - Export current song in MIDI format
Export song - Export current song in WAV format
Quit - Quit Hydrogen
Instruments: this menu offers instruments and drumkit (sound libraries) functions.
Add instrument - Add a new instrument to your current drumkit
Clear all - Delete all instruments from the current drumkit
Save library - Saves all instruments settings (and their sound samples) in $HOME/.hydrogen/data/library_name
Export library - Compress all instruments samples and settings in a drumkit in $HOME/.hydrogen/data/library_name
Import library - Imports another drumkit from the local filesystem or download it from a remote location through an XML feed. The XML file that should be provided is NOT RSS compliant (see Hydrogen website for an example). To load another drumkit in your current working session of Hydrogen, read Section 7.
Tools: opens the mixer, the playlist editor, the instrument rack and the general preferences window.
Playlist editor - A tool to manage playlists.
Mixer - Open the mixer window.
Instrument rack - Open the instrument rack panel.
Preferences - Open the main preferences window. Read Section 3 on how to configure Hydrogen.
Debug: tools mainly for debugging and monitoring Hydrogen (only available when compiled with debug support).
Show audio engine info - Open a monitor with various stats
debug action - Insert debug commands.
Print Objects - Print on stdout current objects map.
Info
User manual - Open a window with this manual :)
About - The usual window with licence information, acknowledgements, etc.
Before analyzing the two main frames of Hydrogen, let's take a quick look at the main toolbar and its components:
Pilot the song using the start, stop, pause, etc. buttons
Choose between "pattern" or "song" mode: in "pattern" mode only the currently selected pattern will play, while in "song" mode all patterns inserted will be played.
An advanced tap tempo function: choose note length and how many notes to wait before recalculating BPM, then click the comma key repeatedly until the 'R' letter will appear and the BPM will be updated. (see Section 3.1)
Manually set BPM
Manage JACK transport
Open the mixer and the instrument rack panels

Alle knoppen om te starten, stoppen, doorspoelen, terugspoelen en om het het patroon of de opname te herhalen. Je kunt ook de spatiebalk gebruiken om te starten en te stoppen.

Hier kun je schakelen tussen de patroon en opname mode.

Als je het tempo van een nummer wil aanpassen klik je op de + of - knop. Om de metronoom aan of uit te schakelen kan je het onderste knopje gebruiken.

XXX

XXX

XXX
Andere handige sneltoetsen:
[CTRL + O] = Opname openen
[CTRL + S] = Opname opslaan
[Backspace] = Liedje of patroon herstarten vanaf het begin.
It is possible to change tempo at any time using the tap-tempo and BeatCounter features of Hydrogen. You can change these while playing or while the song is stopped. To change the tempo, hit the , (comma) key in tempo for the number of beats in the measure. After the correct number of beats are met, the tempo will change to the average tempo that you tapped in. If you continue to tap, these new taps will become a part of a rolling average. If you tap accidentally, or if you wait too long between taps, the tap tempo counter will start over.
The Tap Tempo is a part of the BeatCounter, which is essentially a Tap Tempo on steroids. By default the BeatCounter display is not visible. To see the BeatCounter widget click the upright button (BC) between Song/Pattern mode selector and the BPM-widget. Or, it can be shown by pressing the comma key (,).
The tempo that you tap will be considered even beats of the beat type. The beat type can be set to 1/8 (for eight-note beats), 1/4 (for quarter-note beats), 1/2 (for half-note beats), and 1/1 (for whole-note beats). To change the beat type use the left arrow buttons. To change the number of beats that are counted, use the right arrow button. You can set from 2 to 16 beats. (I.e. if you set the beat to 6, you will have to tap 6 times before the new tempo is computed and set.) When the display shows an R, it means that the BeatCounter is ready to start from 0. Every time you tap with the comma key, it will show the number of taps that you have entered (1, 2, 3...).
The button in the bottom right-hand controls the auto-start feature, and it toggles between S and P. When it shows P for (Play), the song will set the new tempo and automatically start to play after you tap the right number of beats (if it's not already playing, of course). This way, if you have the BeatCounter set up for 4/4, you can tap 1-2-3-4, and start playing on the next beat. When it shows S (for Set BPM), the auto-start is disabled.
For example: Suppose you have a live band, Hydrogen, and a softsynth that is controlled by Seq24)... and you want them all to start at the same time. Set the beat type to 1/4 and the number of beats to 4. Enable auto-start (button shows P). Count off the band 1-2-3-4 (while tapping the comma key) — and everyone starts on 1.
Another example: Same situation, but the song doesn't require Hydrogen or synths until some point later. During that time, a human (e.g. guitar player) will be setting the tempo. On the measure before Hydrogen is supposed to play, tap the comma key 1-2-3-4 with the beat... and you're in on the next beat (at the right tempo).
If you are using the JACK Transport, the BeatCounter continues to work. If another program is the JACK Transport Master, Hydrogen will respond to tempo change events from that application. Note that in this situation, Hydrogen is supposed to be a slave, so some of the BeatCounter features will be disabled or will not work properly. If Hydrogen is the JACK Transport Master, tempo changes from Hydrogen will be reflected in those programs (if they support it).
Some of the settings to adjust the BeatCounter's latency compensation, and they are located on the General tab of the Preferences Dialog ( → ). Here there are two spinboxes:
Beat counter drift compensation in 1/10ms — adjust to compensate for latency between the keyboard and the program.
Beat counter start offset in ms — adjust the time between the BeatCounter's last input stroke and when the song starts playing (if auto-start is activated).
Note that these can be set to positive (+) or negative (-) values. In order to find useful values for these, you will need to take some time to play with it. Also, you may want different values depending on the speed of your hardware, audio devices, drivers, etc. Using the BeatCounter effectively requires practice.
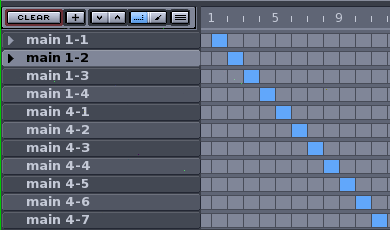
The "Song Editor" (Figure 2.2) gives an overview of the whole timeline of the song (e.g. intro, verse, bridge, chorus and so on); each blue coloured square on this panel is a complete bar as shown in the underlying "Pattern Editor" panel. Here we have complete freedom to add, remove or move patterns in any order we prefer. We can also copy and paste patterns: use left mouse button to highlight an area and drag it around. Dragging with CTRL key pressed copies the patterns.
The Song Editor comes with 7 buttons:

 Completely delete all patterns (asks for confirmation!).
  Create a new pattern (and asks for a name).
  Move currently selected pattern up or down.
  Enable selecting patterns for copy & paste (Select Mode).
  Enable Draw Mode.
  Switch from "Single pattern mode" to "Stacked pattern mode" and back..
XXX
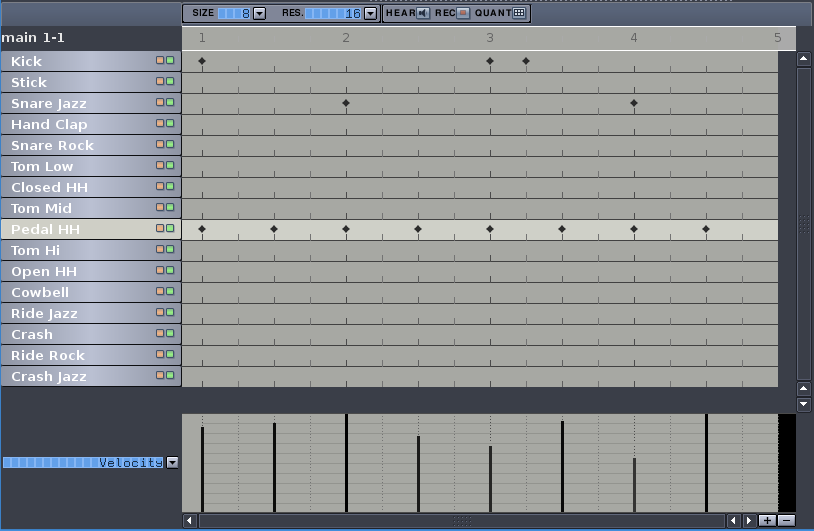
The "Pattern Editor" frame (Figure 2.3) lets us create or modify the pattern (bar) which is being played, or add/remove notes and tune intensity as well. On the higher-left side you find a pair of LCD screens: the first one lets you choose the size of a pattern while the second represents the current grid resolution (4 through 64). Selecting an instrument which has at least one note in the pattern will show a few vertical bars (one per note) on the lowest part of this frame. Those frame shows the so called "note properties". This are special properties which can be set for every single note. Hydrogen knows of 3 Properties: Velocity, Pan and Lead/Lag. Lead and Lag allows a slight note lead or lag in respect of the actual beat. The range is ca. 5 ticks which equals around ca. 10 ms at a tempo of 120bpm.
The button  (hear new notes) will play the sample as it's been added to the pattern. Finally you can move an instrument up and down in the sequence with the buttons
  . A useful “Quantize” feature is available activating
  . This way the beats inserted will automatically respect the grid resolution currently applied.
Rememeber this constraint concerning the grid: if you are working with a resolution of 16 you can't go back to 8 and remove a 16th note; on the other hand if you are working with a resolution of 8 and you try to insert a note in the middle of two bars (looking for a 16 bars precision), notes will be placed in the previous or in the following 8th bar. This contraint can be removed if you disable the whole grid resolution (choose "off" from the grid resolution LCD control). Now you'll be able to place notes wherever you prefer.
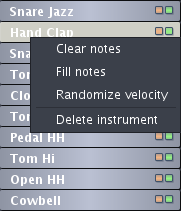
Each instrument has its own set of features accessible right-clicking with your mouse on it; “Fill/Clear notes” fills or deletes every note of that instrument in the current pattern (remember that filling a pattern is always relative to the grid resolution set) and finally “Randomize velocity” automatically apply a pseudo-random velocity to each note of that instrument in the pattern. The more velocity you set on the instrument, the more hydrogen will hit “hard” on that instrument when played.
The small green and red squares beside the instrument name are the “mute” and “solo” buttons.
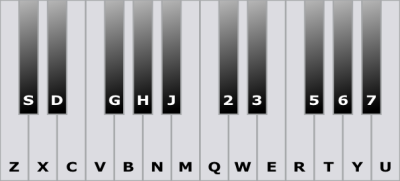
Also, you can set new beats clicking on  which enables direct input by MIDI events or by keyboard according to the following map key=instrument:
Note that the name of the instrument depends on the drumkit loaded. This list refers to the GMKit loaded by default. The position of the instrument, however, is the same.
Z = Kick
X = Snare Jazz
C = Snare Rock
V = Tom Low
B = Tom Mid
N = Tom Hi
M = Cowbell
Q = Ride Jazz
W = Ride Rock
E = Instrument No. 17 (currently not assigned)
R = Instrument No. 18 (currently not assigned)
T = Instrument No. 20 (currently not assigned)
Y = Instrument No. 22 (currently not assigned)
U = Instrument No. 24 (currently not assigned)
S = Stick
D = Hand Clap
G = Closed HH
H = Pedal HH
J = Open HH
2 = Crash
3 = Crash Jazz
5 = Instrument No. 19 (currently not assigned)
6 = Instrument No. 21 (currently not assigned)
7 = Instrument No. 23 (currently not assigned)
Here's a quick reference of the above bindings for your convenience. See Chapter 3 for a basic walkthrough of how the pattern editor works.
The Mixer frame (Figure 2.4) is useful for tuning a global or single volume of the current drumkit. It shows the current peak (click on  to disable, useful on old CPUs) and let you set the maximum peak allowed (tune with the fader knob of the instrument), lets you modify attributes like pan, play solo
  , mute
  or test play only that instrument
  ; selecting in the Pattern Editor an instrument causes a blue LED to light on (near the play button). Near the global volume knob, you can set 3 global effect such a swing (shifts a few notes back or forward not randomly), timing (modify timings of the notes) and humanize effect (random velocity editing).
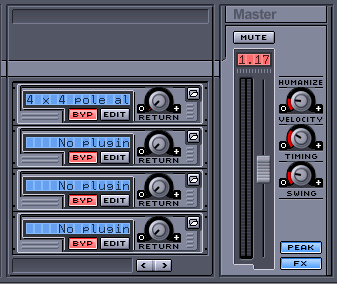
In addition to all this you can set up to 4 special LADSPA effects for each instrument switching the  button. See next section for a detailed overview.
The Sound Library saves you time in managing your drum kits, favorite patterns, and favorite songs. When making new songs and drum kits, the Sound Library makes it easier for you to reuse and mix the instruments and patterns from other kits and songs.
This lists the drumkits that were installed by your system administrator. It was determined by the compile-time prefix. On Unix-like operating systems, this is usually /usr/share/hydrogen/data/drumkits, or possibly /usr/local/share/hydrogen/data/drumkits. These kits are available to all users on the system, and users are usually not able to add to them.
To load a drumkit from here, right-click the drumkit and select . This will replace your current drumkit with the one that you selected. To load a single instrument from that kit, left-click the to the left of the drumkit's name to show all the instruments. With your left mouse button, click and drag the instrument into your current kit. The instrument will be added to the drumkit that you currently have loaded.
These are your own drum kits that you can manage yourself. They are usually stored in $HOME/.hydrogen/data/drumkits. When you are creating a new drumkit, you can save it here by selecting → .
Loading drumkits and instruments to use is the same as for the System Drumkits (see Section 7.1).
Before you save your favorite patterns to the sound library, be sure to edit it's properties by right-clicking and selecting . There, you can give the pattern a title and a category. You can use one of the categories already provided, or create your own categories by simply typing in a category name. The category name is important, because the patterns will be filed by category in the Sound Library.
You can save your favorite patterns in the sound library by right clicking the title of the pattern in the song editor, and selecting . It will appear in the Sound Library underneath Patterns and the category that you assigned to the pattern.
Creating a new drumkit with Hydrogen is done with the Instrument Editor. Using the instrument editor you can load samples, set envelope parameters, set the gain, and a few other advanced features like mute groups, low-pass resonance filter, and pitch randomization.
Instead of creating your own drumkit, you can also use or download existing drumkits using the Section 7.
The synthesizer in Hydrogen is a sample-based synthesizer. A sample is a piece of pre-recorded audio (usually between .1 sec and 3 sec). To play a note, the sample is simply played back at the right time. There's a few concepts and terms that you should understand when you are putting together a drumkit. (See Glossary for more detailed explanations.)
Sampling Synthesizer Terms
- Sample
A short recording of a sound, typically between .1 and 3.0 seconds long.
- Gain
Volume adjustment.
- Velocity
How hard you hit a note.
- ADSR Envelope Generator
An Attack/Decay/Sustain/Release envelope generator. After you trigger a note, Hydrogen will attack the note by increasing its volume from 0 to the full velocity of the note. After reaching full velocity, it will decay the note by lowering the volume until it reaches the sustain level. When the note is released, Hydrogen reduces the volume from the sustain level back down to 0.
- Attack
The amount of time to go from 0 to full velocity.
- Decay
The amount of time to go from full velocity to the sustain volume.
- Sustain
The level (how loud) to hold the note between the sustain and the release. It is a percentage of the velocity. It does not depend on time.
- Release
The amount of time to go from the sustain volume back down to 0.
Typical samples that are used in Hydrogen are: the sound of a single drum hit, the sound of a single cymbal hit, the sound of a single cowbell hit. Whenever you put a note in the pattern (or play a note using MIDI), Hydrogen will play whatever sound you have loaded. So, to put together a drum kit you need to gather short recordings of the bass drum, each tom, each cymbal, the high hat open, the high hat closed, the snare drum (snare on), the snare drum (snare off), rim shots, etc.
However, there are no rules about what a sample can be. It's not uncommon to use Hydrogen to trigger non-drum sounds like: audio clips of people talking, a clip from a song, sound effects, audio clips from movies, and famous people speaking. Be creative!
To start a brand new drum kit, select → . This will give you a bank of 32 blank instruments. To delete instruments, right-click on on each instrument and select . To add more instruments, select → .
Select an instrument to start editing it. This is done by left-clicking on the name of the instrument in the instrument list (at the left). You will notice that the name of the instrument in the Instrument Editor matches the one that you clicked.
After you have your drum kit working the way you want, select → . It will ask you for the name of the kit to save. If you wish to overwrite an existing kit, you will need to type in the same name as the kit that you want to replace.
Drumkits are automatically stored in the data directory (i.e. $HOME/data/drumkits).
To export a drumkit (for sharing with others), it must first be loaded into your Sound Library. Then, select → from the menu. Select the drum kit that you wish to export, and give it a file name to save it to.
For each instrument in a drum kit, you can load several samples and set different synthesizer parameters. This section will step you through how to create a new instrument and load the samples.
To begin creating an instrument, select → . This will give you a blank instrument to start from.
Now, you need two samples. Any .WAV or .FLAC file will do. Hydrogen provides several in the data/drumkits directory.
In the instrument editor, click on . You can layer several samples into the instrument. Which one is played depends on the velocity of the incoming note. Click and point the to your sample. Note that the will allow you to preview the sample before you load it. It will also allow you to load more than one sample at a time. But for now, only load one.
After you load the sample, you'll see that there is now a 1 at the top, and the topmost rectangle has turned light blue. To load a second sample, click the slot just below it, and then click to bring in another sample.
After bringing in both samples, you'll probably notice that only the first sample is being played whenever you trigger the instrument. This is because you need to set the velocity ranges for the layers. Move your mouse to the sides of the light blue rectangles and you see that you get a left-right drag cursor. Now drag the sample to the left or right (like a curtain). You will now see Layer 2 appear.
The velocity setting for the layer is 0-velocity on the left, and full velocity on the right. Set up Layer 1 to sound for soft notes, and Layer 2 to sound for hard notes. (I.e. Layer 1 on the left and Layer 2 on the right.)
Now, in the pattern area, set up a simple pattern that plays this instrument. Adjust the velocity settings on each note so that you can get the different samples to sound. Now set the pattern to loop and notice how your different samples are getting triggered. (To learn about editing a pattern, see Section 5)
For each layer, you can set the and the . The pitch also has a adjustment.
Use the adjustment to control how loud the sample will play. This is necessary because it's extremely difficult to get a set of samples that all sound at about the same volume. By adjusting here, the samples that were recorded too quietly can be turned up to match your loud samples (that had to be turned down).
Warning
It is very easy to set the too high, causing your sample to clip. Remember to test the gain with full-velocity notes. If you clip your signal here, it will only get worse as Hydrogen processes it.
The pitch of the sample can be modified with the pitch controls. The knob adjust the pitch in musical half-steps. (So, -12 is down 1 octave). The pitch on the right adjusts the pitch ±50 cents. (One half-step is 100 cents.)
Note
The pitch is adjusted by playing the sample back faster or slower. This is called the Dopplar Effect. So, if you have a 1-second sample that you turn down -12 (1 octave), you sample will only last for .5-seconds.
In the instrument editor, click on the button. Here you can adjust several parameters that are for the whole instrument (not for each layer). The parameters that you can adjust are:
Envelope parameters: , , , . (See Envelope Generator)
: The overall volume of the instrument.
: Which mute group this instrument is a member of (see Mute Group).
Filter Parameters: ass, , .
It's important that you understand Section 8.1 in order to continue on.
When the instrument is triggered, its volume is run through an ADSR Envelope. The parameters operate as follows:
Attack — the amount of time that the volume of the sample goes from 0 to the full velocity of the note. If the value is 0, the sample will play immediately at full velocity. If the value is 1.0, the sample volume will use the maximum time available for the attack paramater. [1]
Decay — the amount of time for the volume of the sample to go from full velocity down to the sustain volume. If the value is 0, the sample will immediately skip from the attack volume to the sustain volume. If the value is 1.0, the sample volume will use the maximum time available for the decay parameter.[1]
Sustain — the volume to play the note after the decay phase is over, and until the note is released. If set to 0, the note will be silent. If set to 1.0, the note will play at full velocity.
Release — the time to fade out the note from the sustain volume back down to 0 (silent). If set to 0, the note will fade out in the minimum amount of time (about 5 ms). If set to 1, it will fade out for the maximum time available.[1]
If the sample is shorter than the times that you specify, the sample will end, regardless of which phase of the ADSR it is in. If the note is sustained, it does not draw out the note while you are holding it. It only holds the gain (volume) parameter during that time.
The gain sets the overall volume for the sample. This gain is applied after the gain that you set for the layer, and before the gain that is set for the mixer. If the Gain is 0, the instrument will be silent. If the gain is 1.0 the volume of the samples will not be adjusted (i.e. 0 dB). If the gain is set higher, the samples will be amplified.
Warning
It is very easy to set the too high, causing your sample to clip. Remember to test the gain with full-velocity notes. If you clip your signal here, it will only get worse as Hydrogen processes it.
Hydrogen provides more mute groups than you know what to do with (over 256). A mute group is a grouping of instruments that are mutually exclusive — only one instrument may be playing at any time. If one is playing and another instrument in the group is triggered, it will immediately silence (mute) and start playing the other instrument. This is useful, especially, for instruments like hi-hats where the open sound and the closed sound are different instruments.
If the mute group is set to Off, then the instrument is not part of any mute grouping. If the mute group is set to any number, then that is the group that the instrument is a part of. To set other instruments into the same grouping, set their mute group parameter to the same number. (For example, to group all the high-hat instruments, you can set all their mute group parameters to 1. To have a snare drum mute group, set their mute group parameters to 2.)
The filter is a low-pass resonance filter. If you don't wish to use is, click the ass button so that it's red. If it's not red, then the filter is active. The cutoff parameter adjusts the cutoff frequency for the filter. The resonance parameter adjusts how much to resonate the cutoff frequency. If the resonance is set to 0, then the filter is just a simple low-pass filter.
Note
The cutoff frequency of the filter varies with the sample rate of your audio card. The range of the knob (0 to 1.0) is optimized for a 48,000 kHz sample rate.
The random pitch paramater allows you to randomly vary the pitch of the sample every time it is triggered. The value is set between 0 and 1.0. The pitch change is fairly small: ±2 half-steps × value. Using this sparingly can help your sequences to sound more like a real drummer.
With all of the different parameters available to tweak, it can be difficult to set up something that sounds nice when you're done. Here's a few tips on setting up an instrument:
Turn down the gain. Every time you have a gain knob (i.e. an amplifier), this is called a gain stage. With every gain stage you have, it's easy to overdrive your signal — which means the signal gets distorted by clipping. In addition, if you have two samples that, by themselves, peg your meters — what do you think happens when you combine them? That's right, you overdrive the signal again.
If things sound bad and distorted, start by turning down the gain setting on the layer... especially if it's larger than 1.0. Then turn down the instrument gain. Then any gain on a LADSPA effect. Then the fader on the mixer. Then the master output fader.
Test samples at full velocity. Your sample will be played louder if the velocity is higher. So, if you set everything to sound nice and full with velocity at 0.7, what will happen when you get a full velocity of 1.0? (Hint: clipping.)
Try to use samples that are -6 dB max. Visually, this means samples that peak at only 1/2 of full scale. Otherwise, turn your layer gain to about .5.
Remove all DC offsets from the sample. In a sample editor, there is usually a line down the center of your sample's waveform. This is the zero-line. The beginning of your sample should be on this line. The end of your sample should also be on this line. However, if your signal is a little above or a little below this line, you will hear a click at the beginning and the end of your sample whenever it is played. If your sample editor doesn't provide any tools to fix a DC Offset problem, you can eliminate the noise by putting a slight fade-in/out at the ends of your sample.
The ADSR will not be longer than your sample. If you have a short sample, it doesn't matter how long you set the attack and delay — the sample will stop playing at the end.
Things change with the sample rate. If you have a really nice setup with all your parameters painstakenly tweaked... things will change if you change the sample rate of your audio card. Many of Hydrogens internal settings and parameters are done based on how many samples go by, and not on how many seconds go by. The sort of things that change are: anything time-base (like attack and release) and anything frequency based (like the cutoff frequency).
Hydrogen can also add effects to sounds using any LADSPA plugin library. You need to have installed the LADSPA sources (available from http://www.ladspa.org) and while this will give a rough idea of how it works you should really have a taste of the real thing installing one or more plugin libraries, it's as simple as a scons && scons install. Here are a few places to download plugin libraries:
SWH-Plugins available at http://plugin.org.uk. Note that before compiling these plugins you need the FFTW tarball from http://www.fftw.org.
CMT available at http://www.ladspa.org.
TAP available at http://tap-plugins.sf.net.
Plugins Kill
A LADSPA plugin is compiled, executable code. It is capable of hanging, crashing, freezing, screaching, overflowing buffers, and even phoning home. If you start having issues with Hydrogen, disable your plugins and see if things improve. Some plugins are not designed for real-time use, and some are just plain better than others.
Once you have installed a few plugins open a song you'd like add an effect to and select an instrument that has a few beats in the pattern. In the Mixer click on  and select one of the four available effect line Click on the Edit button (
  ), than on “Select the FX”: this will bring up another window (Figure 2.5) that lets you choose an effect amongst those installed, they are alphabetically sorted and categorized. Once you're done, adjust the level from the mixer and start playing. Each round knob in the FX part controls the level of its effect.
 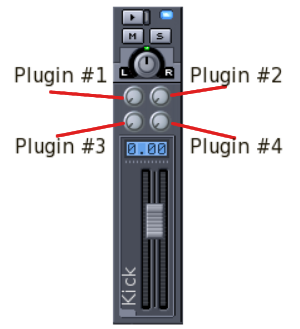 If you want to quickly enable/disable the effect click the Bypass (
  ) button.
[1] The attack, decay, and release parameters are all set by the number of audio samples. This means that the time changes depending on the sample rate of your sound card. The max time for each of them is 100,000 audio samples (typ. 2.27 sec at 44.1 kHz).
Table of Contents
XXX
Hydrogen has 2 main modes: "Pattern" mode and "Song" mode (refer to Section 3 for the buttons to activate). When "Pattern" mode is activated the current pattern is continously repeated, so to help changing it until we don't like it, while "Song" mode repeats only the current pattern: this is useful when putting together the patterns, to create the whole structure for the song.
We'll start from an empty song with an empty pattern, as created by default: "pattern" mode should be selected now. It is also possible to change name of the pattern. Now let's click on the “Play” button and while the pattern is playing let's add notes in the grid of the Song Editor (Figure 3.1) simply left_mouse_clicking on it: adjust grid resolution and BPM speed if needed. Rememeber some constraints of the grid: if you are working with a resolution of 16 you can't go back to 8 and remove a 16th note; same thing happens if you are working with a resolution of 8 and you try to insert a note in the middle of two bars (looking for a 16 bars precision): they will be placed on the previous or on the following 8th bar (unless you choose “off” from the Grid Resolution LCD, in this case you're free to place notes wherever you prefer). Be sure to select the correct pattern in the Song Editor before adding notes in the Pattern Editor!
Once patterns are created (Figure 3.2), we can copy/paste/delete them simply dragging with the mouse (activate the select mode for the Song Editor and keep pressed left mouse button to select those you want to move or copy).
Natuurlijk kunnen we ook het Mixer venster gebruiken tijdens het maken of afspelen van patronen
The Mixer frame (Figure 3.3) is made of 32 independent tracks, each of these is binded to an instrument, plus a "Master Output" line to adjust general output volume and a "FX" button to set effects. Every line features 3 buttons ( 

 ), pan adjust (
  ), current maximum peak, volume fader and name of the track. Clicking on
  will play the selected instrument, cutting the others. The "Mute" button
  , simply mute that instrument. The maximun peak indicates the maximun volume reached from the instrument; the peak must be in a range of 0.0 and 1.0 (in Figure 3.3 you can see a few volumes too loud), otherwise it will get distorted producing a weird sound (especially with OSS audio driver), in this case it's better to set volume down; keep an eye on each vu-meter.
This is a glossary of general terms encountered when using Hydrogen, synthesizers, drums, or samplers. The definitions in the text are simplified, but the definitions here are more general and have more explanation. For example, the text of the manual would have you believe that an ADSR is the only kind of envelope generator, and could only ever control the volume. While it's simple for new users, it's not quite right.
- ADSR
A type of envelope generator that allows you to control the Attack, Decay, Sustain, and Release parameters. Generally, the parameters are proportional to the velocity.
In Hydrogen, the ADSR envelope generator only controls the volume (attenuation).
Read more about this in the Wikipedia Article ADSR Envelope
See Also Envelope Generator, Attack, Decay, Sustain, Release.
- Attack
This is the first phase of an ADSR envelope, and is the amount of time to turn the parameter up from 0 to full velocity after triggering the note.
See Also ADSR.
- Attenuation
In filters and mixers, this the amount that a signal is reduced (volume).
See Also Roll-off.
- Band-Pass Filter
A filter that preserves a cetertain band of frequencies, and attenuates (silences) all others. This is often done by combining a high-pass and a low-pass filter.
See Also Filter, High-Pass Filter, Low-Pass Filter.
- Clipping
A phenomenon that happens to a signal when the signal is too large for whatever is receiving it. The peaks of the signal (which are normally smooth curves) get cut off straight at the max volume (clipped). This distorts the sound and is usually undesirable.
An example of clipping is when you play music louder than your speaker can handle. Parts of the music sound harsh and fuzzy.
- Cutoff Frequency
On high-pass and low-pass filters, this is the frequency that divides between those that pass, and those that are attenuated (silenced). In a high-pass resonance filter, or a low-pass resonance filter, the cutoff is also the frequency zone that gets boosted.
For example, if you have a low-pass filter and you set the cutoff frequency high (i.e. 20kHz)... the filter will not affect the sound. All the audible frequencies will pass through undisturbed. As you lower the cutoff frequency to something like 40 Hz (the low string on a bass guitar), it sounds like someone is putting a blanket over the speaker. The higher frequencies are being attenuated above 30 Hz.
See Also Filter, High-Pass Filter, Low-Pass Filter, Resonance Filter.
- Decay
After reaching full velocity from the attack, this is the amount of time to turn the parameter down from full velocity to the sustain level.
See Also ADSR.
- Envelope Generator
A way to control (change) a parameter over time as a response to triggering, holding, and releasing a note.
Did your eyes just glaze over? Let's try again:
Imagine that you're playing a note on the keyboard and you have your other hand on a knob (volume, filter cutoff, etc.). As you play the note, you twist the knob (often up, then down... or down, then up). You do the same thing on each note. That's what an envelope generator does. See also ADSR
- Fader
A slider control used to adjust the attenuation (volume) in a mixer. Faders always have an "audio" taper, which means that the attenuation amount changes on an exponential scale.
- Filter
A device that changes a sound by attenuating specific frequencies. A tone knob is an example of a simple, low-pass filter.
See Also Band-Pass Filter, High-Pass Filter, Low-Pass Filter, Resonance Filter.
- Gain
In an amplifier, this adjust how much (or how little) a signal is amplified (volume). A higher gain value is a louder signal.
- High-Pass Filter
A filter that attenuates (silences) low frequencies, but allows high frequencies to pass through.
See Also Filter, Cutoff Frequency.
- Instrument
In Hydrogen, an instrument is a single noise-maker (like a bass drum kick, or a tom).
- Layer
In an instrument you can load several different samples (each one called a layer), and have a different sample play depending on the velocity of the note. Only one sample at a time will play.
Suppose you have a sample of a floor tom being struck softly. If you simply play the sample louder — it will not sound the same as a real tom that has been struck very hard. If you wish to mimic this in your instrument, you can load one sample for soft playing, and a different sample for loud playing.
See Also Instrument.
- Low-Pass Filter
A filter that attenuates (silences) high frequences, but allows low frequencies to pass through.
See Also Filter, Cutoff Frequency.
- Mute
To make no noise. A setting on an instrument that prevents any audio output.
- Mute Group
A group of instruments (samples) that should mute (stop playing) immediately after another instrument in the group is triggered.
This is typically used in hi-hats, where there's a different instrument (sample) for when the hi-hat is open or closed. With a real hi-hat, the sound of the open hi-hat will stop as soon as you close it. However, if you use two samples — the open sound will continue even after you have triggered the closed sound. By placing both instruments in the same mute group (group #1, for example)... triggering closed sound will immediately stop the open sound (and vice versa).
- Octave
A span of frequencies where the top-most frequency is exactly twice the frequency of the bottom frequency.
For example, the range 20 Hz to 40 Hz is an octave. So is 120 Hz to 240 Hz, and 575 Hz to 1150 Hz. While the frequency differences are very different (20 Hz, 120 Hz, and 575 Hz, respectively), to the human ear they sound like the same distance.
- Release
After the note is released, this is the amount of time to reduce the parameter from the sustain level to 0.
See Also ADSR.
- Resonance
When referring to a resonance filter, this is the parameter that determines how much of a boost (gain) to give the frequencies at the cutoff.
See Also Resonance Filter.
- Resonance Filter
A filter that gives a large boost to a very narrow range of frequencies. Typically it will be part of a high-pass or a low-pass filter, where the boosted frequencies are centered on the cut-off frequency.
See Also Filter, Cutoff Frequency, Resonance.
- Roll-off
This is the amount that frequencies are attenuated (suppressed) as the frequency changes (typically measured in dB/octave).
For example, in a low-pass filter the frequences below the cutoff frequency are not attenuated (they pass-through with the same volume). Same with the cutoff frequency. As you go above the cutoff frequency, the frequencies that are near the cutoff frequency are not attenuated very much at all. However, the frequencies that are much higher than the cutoff are attenuated (suppressed) a lot. This is usually approximated by a straight line (on a log scale) and measured in in dB of attenuation per octave of frequency.
See Also Attenuation, Filter.
- Sample
A short recording of a sound, typically between .1 and 3.0 seconds long.
- Sustain
The level to hold the parameter after finishing the decay time. This level will be maintained until the not is released.
See Also ADSR.
- Velocity
How hard you hit a note.
MIDI devices are required to send this information along with the note. Synthesizers use this information to adjust several parameters on the sample (typically the volume). In Hydrogen, it is only used to adjust how loud the sample is played back.
